3D Printing Troubleshooting: Common 3d Printing Issues and How to Fix Them
3D printing is an exciting and rapidly evolving technology that allows makers, designers, and engineers to bring their ideas to life with remarkable precision and creativity. Whether you’re crafting prototypes, models, or custom parts, 3D printing offers endless possibilities across various industries. However, despite its many advantages, the process can sometimes be unpredictable. Even the most experienced users often run into challenges that affect print quality, machine performance, and overall output. That’s where 3D printing troubleshooting becomes essential.
This detailed 3D printing troubleshooting guide is here to help you understand and resolve common problems that arise during the 3d printing process. Whether you’re dealing with stringing, warping, poor adhesion, under-extrusion, or layer shifting, this 3D printer troubleshooting guide will walk you through each issue with practical solutions. Effective 3D print troubleshooting can make the difference between a failed print and a successful project.
If you’ve ever found yourself wondering how to troubleshoot a 3D printer, you’re not alone. Many users face similar issues, especially when working with new materials or adjusting settings. This guide is designed to be a go-to resource for troubleshooting 3D printing, providing step-by-step instructions, expert tips, and clear explanations. Whether you’re a beginner or a seasoned enthusiast, learning how to troubleshoot 3D printer problems will significantly improve your printing experience.
With the right knowledge and a reliable 3D printer troubleshooting strategy, you can overcome obstacles with confidence and return to creating high-quality prints. So dive into this comprehensive 3D print troubleshooting guide and unlock the full potential of your printer, one solution at a time.
Common 3D Printing Problems and Solutions

1. Warping
Symptoms:
Warping is a common issue in 3D printing where the corners or edges of the print lift from the build plate, causing a distorted or curved base. This issue often results in prints that are unusable or dimensionally inaccurate. If you notice that your print is not staying flat and the base is curling upwards, you’re likely experiencing warping.
Causes:
This 3D printing problem is typically caused by uneven or rapid cooling of the filament, which leads to internal stress and separation from the print bed. Common causes include:
- Uneven cooling of the material during the printing process
- Improper bed adhesion, especially when printing with materials like ABS or Nylon
- Incorrect bed or nozzle temperature settings that do not match the filament requirements
- Environmental factors such as drafts or low room temperature that cool the print too quickly
How to Fix It:
To troubleshoot 3D printer warping effectively, follow these tried-and-true solutions:
- Use a heated bed: Ensuring your print bed is heated to the appropriate temperature for your specific filament helps prevent rapid cooling and improves adhesion. Materials like ABS require higher bed temperatures than PLA.
- Improve bed adhesion: Apply adhesive materials such as glue sticks, blue painter’s tape, or hairspray to the print bed to enhance grip. You can also use special build surfaces like PEI sheets or textured build plates to minimize warping.
- Level the bed properly: A well-leveled bed ensures the first layer adheres uniformly, which is crucial in troubleshooting 3D printing warping issues.
- Enclose your printer: Using an enclosure helps maintain a stable printing environment by protecting the print from drafts and sudden temperature changes. This is particularly important when printing with high-temperature filaments.
- Adjust cooling settings: Reduce the speed of part cooling fans during the first few layers to allow better bonding and thermal consistency.
- Use a brim or raft: Adding a brim or raft in your slicing software increases the surface area of the first few layers, improving adhesion and minimizing curling.
3D print troubleshooting for warping involves understanding both environmental and mechanical factors. If you’re still struggling, consult your 3D printer’s user manual or refer to this 3D printer troubleshooting guide for more advanced tips. Proper troubleshooting of 3D printing warping ensures stronger, more reliable prints every time.
Many adhesion and warping issues come down to material quality and temperature control. Choosing the right filament and printer setup can prevent these problems entirely.
2. Layer Shifting
Symptoms:
Layer shifting is a frustrating and noticeable 3D printing issue where the printed object appears misaligned, with layers suddenly shifting to one side. This results in a staggered, skewed, or zig-zag appearance that ruins the structural integrity and aesthetic of your model. If your print starts correctly but later ends up with layers out of place, you’re likely dealing with a layer shifting problem.
Causes:
Layer shifting is usually a mechanical or motion-related issue. Some of the most common causes include:
- Loose belts that slip during movement, causing the print head to shift unexpectedly
- Stepper motor issues, such as overheating or insufficient current, which cause the motor to miss steps
- Sudden movements or external vibrations that disrupt the printer’s positioning during printing
- Obstructions or debris on the rails or around the print area that physically block smooth movement
Firmware or slicing errors that send incorrect positioning commands to the printer
How to Fix It:
To properly troubleshoot 3D printer layer shifting issues, consider the following fixes and preventive measures:
- Tighten belts and check pulleys: Inspect all belts on your 3D printer, especially the X and Y-axis belts. They should be snug but not overly tight. Also, ensure pulleys are firmly attached to the motor shafts and do not spin independently.
- Inspect for mechanical obstructions: Examine the entire motion system for any debris, bumps, or misalignments that might cause resistance. Even a small bit of filament can throw off precision and cause shifting.
- Reduce print speed: Slowing down your printer can help minimize sudden accelerations and vibrations, which are common culprits in 3D printing troubleshooting for layer misalignment.
- Check stepper motors and drivers: Ensure your stepper motors are not overheating or underpowered. If necessary, adjust the stepper driver voltage or check for firmware updates that improve motion control.
- Secure your printer: Place your printer on a stable, vibration-free surface to prevent external interference during printing. Unintentional bumps or shaky surfaces can easily cause a print to shift.
- Use acceleration and jerk control: Adjust these settings in your slicer to smooth out rapid directional changes. This is especially helpful in 3D print troubleshooting related to print head movement.
Layer shifting troubleshooting in 3D printing requires both mechanical checks and software fine-tuning. By systematically addressing each potential cause, you can restore precise alignment and prevent future issues. A reliable 3D printer troubleshooting guide like this one is your best resource when trying to maintain consistent, high-quality prints.
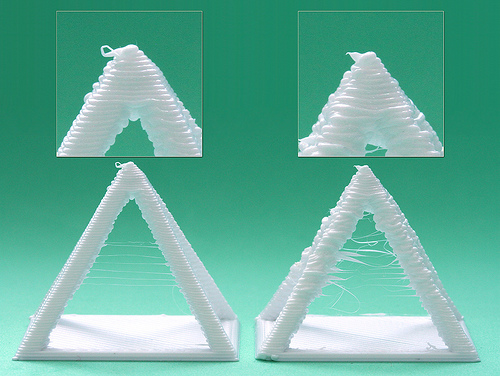
3. Stringing and Oozing
Symptoms:
Stringing and oozing are common 3D printing problems that occur when thin strands or “hairs” of filament are left between parts of your print. These wispy threads can ruin the appearance of detailed models and often require post-processing to remove. If your prints have spiderweb-like strings connecting different areas or blobs forming during travel moves, you’re likely facing a stringing issue.
Causes:
This issue typically arises from the uncontrolled flow of filament during non-print moves. Key causes include:
- Incorrect retraction settings, such as insufficient retraction distance or speed, that fail to pull back the filament effectively
- High print temperatures, which make the filament too runny and prone to dripping from the nozzle
- Slow travel speeds, giving melted filament more time to ooze
- Moist filament, which can create steam and contribute to stringing during extrusion
Nozzle or hotend issues, like partial clogs that disrupt retraction behavior
Inconsistent extrusion and clogs often start with low-quality filament. Using clean, precisely manufactured materials helps eliminate these issues at the source.
How to Fix It:
To effectively troubleshoot 3D printer stringing and oozing issues, try the following adjustments and tips:
- Enable retraction: Make sure retraction is enabled in your slicer settings. This tells the printer to pull filament back into the nozzle during travel moves to prevent dripping.
- Adjust retraction distance and speed: Increase the retraction distance slightly (typically between 4–6 mm for Bowden setups and 1–2 mm for direct drive systems), and increase the retraction speed to reduce the chance of oozing. Fine-tuning these parameters is a crucial part of 3D printing troubleshooting.
- Lower the nozzle temperature: High temperatures can make the filament too liquid, increasing the likelihood of stringing. Lower the nozzle temperature in 5°C increments and run test prints until the stringing is minimized.
- Increase travel speed: Faster movement between separate parts of the print reduces the time available for filament to ooze. This is a simple and effective trick for 3D print troubleshooting related to stringing.
- Dry your filament: Moisture in filament leads to popping, bubbling, and excess stringing. Use a filament dryer or store filament in airtight containers with desiccants to avoid this problem.
- Enable coasting or wiping (if available): These slicer features stop extrusion just before the end of a move to prevent pressure build-up and unwanted filament leakage.
Properly troubleshooting 3D printing stringing requires a balance of hardware, temperature, and slicer settings. Every filament behaves differently, so regular calibration is key. With these tips and guidance from this 3D printer troubleshooting guide, you’ll be able to print cleaner, more professional-looking models—without the mess of unwanted strings.
4. Poor Bed Adhesion
Symptoms:
Poor bed adhesion is one of the most common 3D printing issues, especially for beginners. This problem occurs when the first layer of your print does not stick properly to the build surface, resulting in prints that shift, curl, or detach entirely during the process. If you find your print peeling off, lifting at the corners, or failing to start cleanly, you are likely experiencing a bed adhesion problem.
Causes:
Several factors can contribute to poor adhesion between the first layer and the print bed. These include:
- A dirty or greasy print bed, which prevents the filament from bonding with the surface
- An uneven or unlevel bed, causing inconsistent nozzle height across the print area
- Incorrect first layer settings, such as speed, temperature, or layer height
- Improper nozzle distance from the bed, either too high or too low
- Low bed temperature, especially when working with filaments like ABS or PETG
- Unsuitable build surface for the type of filament being used
How to Fix It:
To successfully troubleshoot 3D printer adhesion problems, try these proven solutions and adjustments:
- Clean the print bed thoroughly: Use isopropyl alcohol (90% or higher) on a lint-free cloth to remove any oils, dust, or leftover adhesive from the print surface. This is a crucial first step in any 3D printing troubleshooting guide.
- Level the bed and calibrate the nozzle height: A perfectly leveled bed and correctly set Z-offset ensure that the first layer is pressed evenly into the build surface. This step is essential for achieving consistent prints and is one of the core tasks in 3D print troubleshooting.
- Slow down the first layer speed: Reducing the print speed for the first layer (to around 20-30 mm/s) allows the filament to settle and stick better. This is a simple but effective strategy in troubleshooting 3D printing adhesion issues.
- Use a brim, raft, or skirt: Adding a brim or raft in your slicer can significantly improve first layer adhesion by increasing surface area contact. Skirts help prime the nozzle but are less effective in improving adhesion alone.
- Adjust bed temperature: Use the correct bed temperature for your filament type—PLA generally sticks well at 50–60°C, while ABS and PETG require 80–100°C. A warm bed promotes better bonding and reduces the chance of warping.
- Choose the right build surface: Different materials respond better to different surfaces. Glass beds, PEI sheets, textured flex plates, or even blue painter’s tape can enhance adhesion, depending on the filament used.
- Use adhesion aids if needed: Products like glue sticks, hairspray, or specialized 3D printing adhesives can help create a stickier surface and reduce early-layer detachment.
Poor bed adhesion can lead to failed prints, wasted material, and lost time. With the help of this 3D printer troubleshooting guide, you can confidently identify and resolve the root causes of poor first-layer bonding. Troubleshooting 3D printing starts with mastering the first layer—and once you do, your print success rate will drastically improve.
5. Under-Extrusion
Symptoms:
Under-extrusion is a common and often frustrating 3D printing troubleshooting issue where your printer fails to extrude enough filament during the print. This results in visible gaps between layers, thin or brittle prints, missing sections, or uneven surfaces. If your models appear weak, incomplete, or fragile, there’s a good chance you’re dealing with under-extrusion.
Causes:
Several factors can lead to under-extrusion, and identifying the root cause is key to effective 3D print troubleshooting. Common causes include:
- A partially clogged or blocked nozzle, which restricts the filament flow
- Incorrect flow rate settings in your slicer software, often set too low
- Uncalibrated extruder steps/mm, meaning your printer is not pushing the correct amount of filament
- Low-quality or moisture-damaged filament, which can jam or grind in the extruder
- Inconsistent filament diameter, which causes irregular extrusion patterns
- Too low print temperature, making it harder for filament to melt and flow properly
- Extruder motor issues, such as slipping gears or tension problems
How to Fix It:
Here are some reliable steps to troubleshoot 3D printer under-extrusion and get your prints back on track:
- Clean or replace the nozzle: Start by inspecting your nozzle for partial clogs. You can use a needle, cold-pull method, or replace the nozzle entirely if buildup is severe. This is often the first go-to fix in any 3D printing troubleshooting guide for under-extrusion.
- Calibrate your extruder steps/mm: Make sure your extruder is pushing the correct amount of filament by performing an extruder calibration. This helps ensure that what the slicer commands is what your printer actually delivers.
- Check and correct your flow rate: In your slicer software, make sure the flow rate (also called extrusion multiplier) is set to 100% or adjusted properly based on your calibration results. Incorrect flow rates are a common oversight in 3D printer troubleshooting.
- Use high-quality filament: Cheap or inconsistent filament can cause all kinds of extrusion issues. For reliable results, use premium materials from trusted sources like Additive Plus Materials, known for their consistent diameter and purity.
- Dry your filament: If filament has absorbed moisture from the air, it can cause popping, bubbling, and irregular extrusion. Store filament in dry containers with desiccants or use a filament dryer before printing.
- Adjust print temperature: If your nozzle temperature is too low, the filament won’t melt fast enough, restricting flow. Try increasing the temperature in 5°C increments based on the recommended range for your filament type.
- Check for extruder tension and wear: Make sure the extruder gear is gripping the filament properly. If the gear is worn out or tension is too loose, the filament might slip or grind, causing under-extrusion.
Properly troubleshooting 3D printing under-extrusion means carefully checking both hardware and software factors. With the help of this 3D printer troubleshooting guide, you’ll be able to restore smooth and consistent filament flow—resulting in stronger, cleaner, and more accurate prints. Don’t let under-extrusion derail your projects—get back to creating with confidence by following these expert 3D print troubleshooting tips.
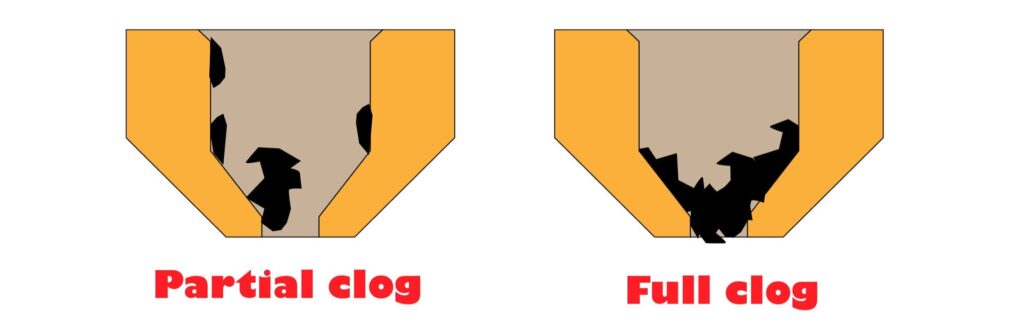
7. Nozzle Clogs
Symptoms:
A clogged nozzle is one of the most frustrating 3D printer troubleshooting issues, often leading to failed prints or inconsistent extrusion. The symptoms can range from partial extrusion to no filament coming out at all. If you hear the extruder grinding, notice weak or spotty first layers, or see the filament curling up around the nozzle tip instead of adhering to the bed, a clog is likely to blame.
Causes:
Nozzle clogs occur when something blocks the flow of molten filament, preventing it from exiting the nozzle smoothly. Common causes include:
- Dust and debris in the filament, which can accumulate and harden inside the nozzle over time
- Incorrect temperature settings, either too low (filament doesn’t melt properly) or too high (burnt filament residue builds up)
- Incompatible filament types mixed in the same nozzle without proper flushing
- Burnt filament residues, especially after long prints or repeated temperature cycling
- Low-quality filament, which may have inconsistent diameters or impurities
- Insufficient retraction settings, allowing filament to ooze and bake inside the hotend
How to Fix It:
Here’s how to troubleshoot 3D printer nozzle clogs quickly and efficiently:
- Perform a cold pull: Heat the nozzle to the softening temperature of the filament, then manually pull the filament out once it cools slightly. This technique can remove debris and residues lodged inside. It’s a go-to fix in any reliable 3D printing troubleshooting guide.
- Replace the nozzle if necessary: If the clog is too stubborn to clear or the nozzle has been used extensively, consider replacing it. Brass nozzles are affordable and easy to swap out, and doing so can save you hours of wasted print time.
- Use filament filters: These small accessories attach to your filament before it enters the extruder, helping remove dust and particles that may cause clogs. Preventing dust buildup is a key strategy in long-term 3D print troubleshooting.
- Check your temperature settings: Make sure you’re printing at the recommended temperature range for your specific filament. Printing too cold can result in poor melting, while too hot can burn the material and cause blockages.
- Purge before switching materials: Always run a purge or flush routine when changing from one filament type to another, especially when switching between materials with different melting points (e.g., PLA to PETG or TPU).
- Use high-quality filament: Investing in reliable, clean filament from trusted manufacturers ensures consistent diameter and purity—two major factors in avoiding clogs. This is a smart move in both troubleshooting 3D printing and preventing future problems.
Clearing and preventing nozzle clogs is essential for maintaining consistent print quality and avoiding downtime. With the tips in this 3D printer troubleshooting guide, you’ll be able to keep your hotend clean and functioning properly, so you can focus on what matters most—creating high-quality 3D prints without interruption.

8. Z-Wobble
Symptoms:
Z-wobble is a subtle but annoying 3D printing troubleshooting issue that results in visible wavy or rippling patterns on the vertical surfaces of your printed models. These waves usually follow a consistent pattern up the height of the object, leading to a distorted or uneven appearance. If your otherwise well-calibrated printer is producing prints with these artifacts on tall or straight surfaces, you’re likely facing Z-wobble.
Causes:
Z-wobble is typically a mechanical issue related to instability or misalignment along the Z-axis. Common causes include:
If mechanical issues persist, upgrading to a precision-engineered system can save time, reduce failures, and improve print consistency.
- Misaligned Z-axis rods, which cause uneven movement as the print head rises
- Bent lead screws that transfer wobble to the X-axis, introducing irregular layer positioning
- Loose or worn couplers between the stepper motor and lead screws
- Z-axis binding, where friction or tension causes the print head to jump or wobble during vertical travel
- Unstable frame construction, particularly in cheaper or DIY printer models
- Unlubricated lead screws, which can create resistance during Z movement
How to Fix It:
Here’s how to troubleshoot 3D printer Z-wobble issues effectively and restore clean, straight vertical layers:
- Align the Z-axis rods carefully: Make sure both Z rods or lead screws are perfectly straight and parallel to the printer’s frame. Misalignment creates resistance and inconsistent Z-layer movement—an essential issue to check in any 3D printer troubleshooting guide.
- Check for bent lead screws: Slowly rotate the lead screws by hand while observing them. If they wobble or shift position visually, they’re likely bent and should be replaced. This is one of the most common hardware-related causes in 3D print troubleshooting for Z-wobble.
- Replace worn or poor-quality couplers: Flexible or damaged couplers can introduce lateral movement. Upgrade to higher-quality or more rigid couplers if needed to reduce unwanted play between the motor and screw.
- Stabilize the frame: Tighten all frame components, especially on the Z-axis and gantry. A solid, sturdy frame is critical for avoiding vertical artifacts and successful troubleshooting of 3D printing mechanical flaws.
- Lubricate lead screws: Apply a light, PTFE-based lubricant to the lead screws to reduce friction. This helps the Z-axis move smoothly and evenly during vertical travel.
- Enable Z-hop (if needed): In some cases, enabling Z-hop during travel moves in your slicer can reduce pressure on the Z-axis and minimize layer disruption.
Z-wobble can be especially frustrating because it’s often caused by small imperfections in your printer’s mechanical setup. However, with careful inspection and these targeted 3D printing troubleshooting steps, you can eliminate wavy lines and restore the smooth, professional finish to your vertical walls. Mastering this aspect of 3D printer troubleshooting will not only improve your print quality but also extend the life and reliability of your machine.
9. 3D Print Failures Mid-Print
Symptoms:
One of the most disappointing issues in 3D printing troubleshooting is when a print fails midway through the process. You might come back to find your printer idle, the nozzle suspended above a half-completed model, or worse—filament spaghetti where your print should be. 3D print failures mid-print can waste hours of time and material, especially during large or complex projects.
Causes:
There are several reasons why a print may stop or fail unexpectedly during the process. The most common causes include:
- Power loss or fluctuations, which cause the printer to shut off without warning
- Filament runout, especially on printers without a sensor to detect empty spools
- Thermal runaway protection, where the printer halts due to unstable temperature readings
- Loose wiring or faulty connectors, which can interrupt communication between components
- Overheating stepper drivers or power supply issues, leading to a safety shutdown
- Corrupt or poorly sliced G-code files, which cause printing to stop partway
- SD card or USB errors, especially with low-quality storage devices or improper ejection
How to Fix It:
To effectively troubleshoot 3D printer mid-print failures, use these proactive solutions:
- Use a printer with resume print functionality: Many modern 3D printers now offer a “resume after power loss” feature. This allows you to continue a print where it left off, minimizing the impact of sudden outages. It’s a must-have feature in any serious 3D printing troubleshooting guide.
- Check power source and cables: Ensure your printer is plugged into a stable power outlet, preferably with a surge protector or UPS (uninterruptible power supply). Faulty power strips or loose plugs are common causes of interrupted prints.
- Monitor filament levels: Always check your filament before starting a long print. Use printers equipped with filament runout sensors to automatically pause the print if the filament runs out or breaks.
- Inspect thermal components: Thermal runaway protection is a safety feature that halts the printer if the temperature sensor fails. Make sure your hotend thermistor is securely connected, and that the heater cartridge is properly installed. Any inconsistency in temperature readings should be addressed before printing.
- Use high-quality SD cards or USB drives: Low-quality or corrupted files can crash a print mid-way. Reformat your card regularly and safely eject it after loading G-code files. This is an often-overlooked detail in 3D print troubleshooting.
- Check G-code files: If you notice prints repeatedly failing at the same point, there could be a problem with the G-code itself. Re-slice the 3d printed model or try using a different slicer to rule out software errors.
- Keep electronics cool: Ensure stepper drivers and the power supply are adequately ventilated. Overheating components may shut down unexpectedly or lead to erratic behavior during a print.
Unexpected 3D print failures mid-print can be both frustrating and time-consuming. However, with a solid understanding of these potential causes and the help of this 3D printer troubleshooting guide, you can minimize interruptions and complete your prints successfully. Reliable hardware, proactive monitoring, and smart slicer settings are all part of effective 3D printing troubleshooting.
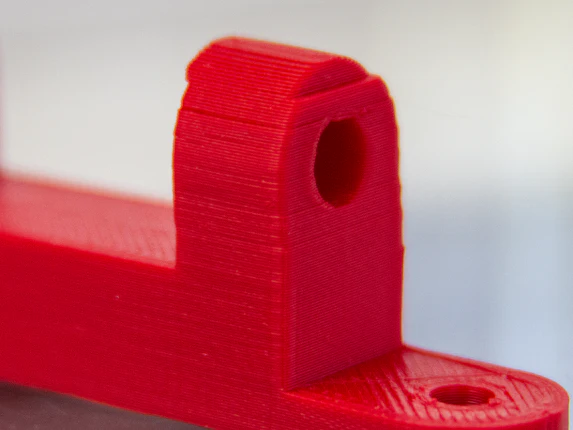
10. Elephant’s Foot
Symptoms:
Elephant’s Foot is a common visual defect in 3D printing troubleshooting, where the bottom layers of a print bulge outward, creating a slight “flared” or squashed appearance at the base. It often looks like the bottom of the print has melted and spread out slightly, distorting the print’s dimensions and making it hard to fit with other parts. If your prints start cleanly but end up with a wider base than designed, you’re likely dealing with Elephant’s Foot.
Causes:
This issue usually stems from settings or conditions that apply too much heat or pressure to the first few layers. The most common causes include:
- Bed temperature too high, causing the lower layers to remain soft and get compressed
- Nozzle too close to the bed, which squishes the first layer too much
- Excessive first layer extrusion, making the bottom layers thicker than necessary
- No active cooling during the initial layers, allowing the base to stay too hot and deform
- Improper Z-offset calibration, where the nozzle presses too hard against the bed
How to Fix It:
To successfully troubleshoot 3D printer Elephant’s Foot issues, try these effective solutions:
- Reduce bed temperature after the first few layers: Start with a high enough temperature to ensure strong bed adhesion (e.g., 60°C for PLA), but then drop the temperature by 5–10°C once the first few layers are complete. This helps solidify the base and prevent sagging. Managing bed temperature is a key factor in 3D print troubleshooting.
- Adjust your Z-offset: If the nozzle is too close to the bed, it will press down the filament excessively, creating a wider base. Fine-tune your Z-offset to achieve a perfect first layer without unnecessary squish. Z-offset tuning is one of the most common adjustments in 3D printing troubleshooting.
- Calibrate first layer settings: Use thinner first layers and reduce the initial flow rate slightly (e.g., 90–95%) to avoid over-extruding at the bottom. Proper first layer calibration helps balance adhesion and dimensional accuracy.
- Enable part cooling after initial layers: Once your first few layers are laid down securely, activate your part cooling fan to help the base cool down and retain its shape. This also helps reduce the likelihood of Elephant’s Foot and other base-related deformities.
- Chamfer the model base (optional): If you’re printing functional parts and need to guarantee perfect fit, consider modifying your model to include a small chamfer at the base. This compensates for the slight flare caused by Elephant’s Foot.
- Check bed leveling: A bed that’s not evenly leveled can create inconsistent nozzle pressure across the build surface, exaggerating the Elephant’s Foot effect on one side of the print. Re-level the bed and run a first layer test to confirm.
Dealing with Elephant’s Foot may seem minor, but it can affect the fit, function, and visual appeal of your 3D prints—especially for mechanical or interlocking parts. By using the techniques outlined in this 3D printer troubleshooting guide, you can ensure your base layers are crisp, clean, and dimensionally accurate. Mastering 3D printing troubleshooting starts with nailing the first few layers, and preventing Elephant’s Foot is a big step toward perfect prints.
For complex or large-format parts, professional printing services can help you avoid costly trial-and-error while achieving consistent results.
Troubleshooting 3D Printer Issues by Category
When it comes to 3D printing troubleshooting, breaking down issues by category can help you diagnose and resolve problems more efficiently. Whether your prints are failing due to mechanical malfunctions, quality inconsistencies, or slicer misconfigurations, understanding which area to focus on can save you time, materials, and frustration. Below is a categorized approach to effective 3D printer troubleshooting that helps both beginners and experienced users alike.
1. 3D Printer Hardware Troubleshooting
Symptoms:
You may experience unusual noises, skipped steps, inconsistent layer alignment, or complete print failure due to hardware malfunctions. Mechanical instability often leads to repeated failures across multiple models and filaments.
What to Check:
If you’re facing frequent mechanical issues with your machine, it’s time to perform 3D printer hardware troubleshooting. Focus on the following areas:
- All belts and pulleys: Ensure belts are properly tensioned—not too loose or too tight—and that pulleys are securely attached to the stepper motor shafts.
- Stepper motor operation: Check for overheating, missed steps, or irregular movement. A faulty stepper motor or misconfigured driver can introduce significant print quality issues.
- Wiring and connectors: Loose or damaged wires and connectors can cause intermittent issues, particularly with temperature readings, stepper motors, or the display.
Pro Tip: If your printer has seen better days or you’re experiencing frequent hardware failures, it might be time to upgrade. Explore reliable, high-performance machines at Additive Plus, where you’ll find 3D printers engineered for precision and durability.
2. 3D Printing Quality Troubleshooting
Symptoms:
Poor surface quality, visible artifacts, dimensional inaccuracy, or fragile prints are all signs that your print settings or materials may need adjustment.
What to Focus On:
High-quality results rely on careful calibration and consistent printing conditions. Here’s how to perform effective 3D printing quality troubleshooting:
- Calibrated extruder and bed: Accurate bed leveling and extruder calibration (steps/mm, flow rate) are fundamental to strong, clean prints.
- Correct slicer settings: Ensure layer height, wall thickness, retraction, and cooling parameters are optimized for the material and model.
- Quality filament and clean hardware: Always use clean, dry filament from reputable sources. Remove dust or debris from your nozzle and ensure your hotend is functioning consistently.
Whether you’re doing artistic work or printing functional prototypes, 3D print troubleshooting at the quality level will drastically improve your outcomes.
3. Failed 3D Prints: What to Do
Symptoms:
If your print starts out fine but begins to sag, collapse, or deform as it progresses, it’s likely due to structural or temperature-related issues.
How to Troubleshoot:
When dealing with 3D print failures mid-print, use this quick guide to assess and recover:
- Pause and inspect mid-print: If you catch it early, pause the print and check the structural integrity. Is it drooping? Collapsing? Warping?
- Check infill, cooling, and wall settings: Weak internal structures (low infill), poor layer cooling, or insufficient wall thickness can all contribute to collapsing prints.
- Consider using support structures: For overhangs, bridges, or tall, thin parts, enabling supports in your slicer can prevent gravity-related failures.
These steps are crucial in troubleshooting 3D printing mid-print issues and minimizing waste.
4. All-in-One 3D Printer Test Troubleshooting
Purpose:
Running test prints designed for calibration is one of the most effective ways to identify multiple print issues at once. These models are a cornerstone of efficient 3D printer troubleshooting.
Tests to Run:
- Print temperature towers: Help you dial in the optimal nozzle temperature for your specific filament.
- Retraction tests: Pinpoint the best retraction distance and speed to minimize stringing and oozing.
- Overhang and bridging tests: Evaluate how well your printer handles unsupported geometry, helping you adjust cooling and speed settings.
These calibration tools are essential for proactive 3D print troubleshooting, especially when switching filaments or after making hardware changes.
By addressing 3D printer troubleshooting in categories—hardware, quality, print failure response, and calibration—you create a more systematic approach to solving issues and optimizing print results. Whether you’re doing a deep mechanical inspection or running a quick retraction test, each fix brings you closer to printing perfection. And remember, using trusted tools, software, and materials like those offered by Additive Plus will make the entire 3D printing troubleshooting process much smoother.
3D Print Troubleshooting Tips
Successfully navigating 3D printing troubleshooting means not only solving problems as they arise but also preventing them from happening in the first place. With the right habits and a little maintenance, you can avoid many common issues that plague 3D printing projects. Whether you’re new to 3D printing or a seasoned maker, the tips below will help you stay ahead of the game, minimize print failures, and ensure high-quality output.
1. Always Start With a Leveled Bed
Proper bed leveling is the foundation of a successful print. An uneven bed causes poor adhesion, inconsistent first layers, and often leads to 3D print troubleshooting problems like warping or layer shifting.
- Use a feeler gauge, paper method, or automatic bed leveling system to ensure the nozzle is evenly distanced across the bed surface.
- Re-level the bed regularly—especially after moving your printer, changing the build plate, or performing maintenance.
A poorly leveled 3d printer bed is one of the most common causes behind print failures and should be your first checkpoint in any 3D printer troubleshooting scenario.
2. Keep Your Firmware Up to Date
Firmware updates often include important bug fixes, performance improvements, and even new features that can assist with 3D printing troubleshooting.
- Check your printer manufacturer’s website or GitHub repository for firmware updates.
- Make sure your motherboard is compatible before flashing new firmware.
- Popular firmware like Marlin frequently includes upgrades to temperature safety, stepper accuracy, and calibration controls that enhance reliability.
Having up-to-date firmware gives you access to the latest improvements in hardware control, making 3D print troubleshooting more effective and accurate.
3. Use the Right Slicer Software and Profiles
Your slicer software translates 3D models into printer instructions (G-code), and mismatched settings can lead to poor print quality or outright failure.
- Use slicers like Cura, PrusaSlicer, or Bambu Studio that are frequently updated and offer rich customization.
- Always select the correct printer model and filament type in your slicer to ensure optimal default profiles.
- When troubleshooting 3D printing, review slicer settings such as layer height, wall thickness, speed, cooling, and retraction values.
Some issues that seem mechanical are actually caused by incorrect slicer configurations, making the slicer an important area for 3D print troubleshooting.
4. Perform Regular Maintenance
Ongoing maintenance is one of the most important yet overlooked areas of 3D printer troubleshooting. Without it, problems like clogs, inconsistent extrusion, or mechanical wear can sneak up on you.
- Clean your nozzle and heat block regularly to avoid buildup.
- Lubricate rails, lead screws, and bearings to keep movements smooth.
- Inspect belts for wear and tension—loose belts are a common source of layer shifting issues.
- Replace worn nozzles, fans, or PTFE tubing as needed.
Regular maintenance is preventative 3D printing troubleshooting—it keeps your machine running smoothly and reduces downtime.
5. Monitor Environmental Conditions
Environmental factors such as temperature, humidity, and airflow can significantly impact print quality.
- Keep your printer in a draft-free environment to avoid issues like warping or layer separation.
- Use an enclosure when printing with temperature-sensitive materials like ABS or Nylon.
- Store filament in airtight containers with desiccants to prevent moisture absorption, which can cause stringing, oozing, and under-extrusion.
Controlling your workspace is a proactive part of effective 3D printer troubleshooting.
6. Run Routine Calibration Prints
Don’t wait for prints to fail—use test prints to proactively identify problems.
- Print temperature towers to find the best nozzle temp for each filament.
- Use retraction tests to eliminate stringing and oozing.
- Run a bed leveling mesh print to visualize uneven areas.
- Try all-in-one test models that combine overhang, bridging, extrusion, and dimensional accuracy tests.
These simple tools help reveal issues before they affect important projects and make 3D printing troubleshooting much faster and easier.
7. Use High-Quality Materials and Tools
Cheap or inconsistent filament is a leading cause of 3D printer troubleshooting frustrations like clogs, poor adhesion, and inconsistent extrusion.
- Choose reliable suppliers like Additive Plus Materials for filament that’s dry, pure, and has consistent diameter.
- Use hardened steel or ruby-tipped nozzles when printing with abrasive filaments like carbon fiber or glow-in-the-dark blends.
- Invest in a digital caliper, a quality scraper, and a reliable build plate for consistent performance.
Quality materials reduce your need to troubleshoot 3D printer problems and improve overall reliability.
8. Keep a Print Log or Troubleshooting Journal
Sometimes the best way to master 3D print troubleshooting is to track what works and what doesn’t.
- Record filament brand, nozzle size, bed temperature, print temperature, slicer profile, and results.
- Note any problems you encountered and what fixed them.
- Over time, this builds a valuable reference that helps you optimize future prints and recognize patterns quickly.
This approach transforms trial-and-error into a methodical troubleshooting process.
By incorporating these tips into your routine, you’ll significantly reduce the need for reactive fixes and level up your overall 3D printing troubleshooting skills. Whether you’re printing prototypes, art pieces, or functional parts, these best practices will help ensure smooth, consistent performance—and fewer print fails.
Conclusion
Troubleshooting 3D printing doesn’t have to be a frustrating process. By understanding the root cause of each issue and applying the right fix, you can greatly improve your print quality and reduce failures. Bookmark this 3D print troubleshooting guide for reference and explore Additive Plus for top-quality 3D printers and materials to keep your prints running smoothly.
Advanced printers with stable motion systems and controlled environments make calibration faster and troubleshooting easier.
Related Posts
1. Introduction Additive manufacturing, commonly known as 3D printing, has fundamentally transformed modern product development,…
Metal additive manufacturing has fundamentally transformed the way industries approach design and production, enabling the…
Imagine a manufacturing process capable of producing parts measured in meters, not millimeters—components so vast…
3D printing is an exciting and rapidly evolving technology that allows makers, designers, and engineers…
Ashkhen Ovsepyan
Additive manufacturing expert and tech business leader, focused on global strategy, innovation, and advancing women in 3D printing.