Step-by-Step Guide: How to Smooth the Top Layer of Your 3D Prints
-
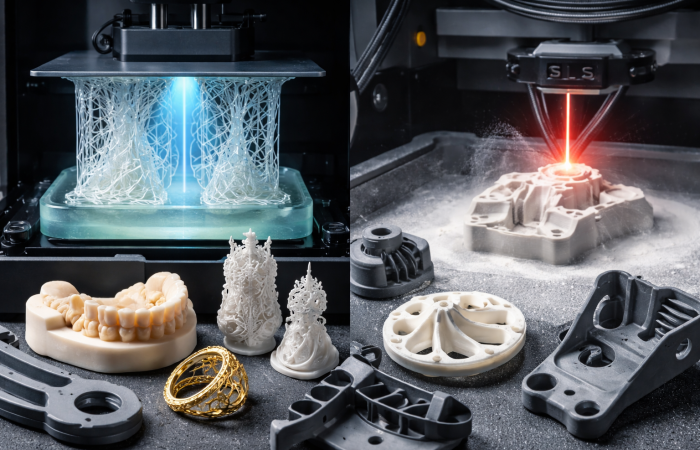
Rapid Resin 3D Printing for Functional Prototypes & High-Detail Models
Ultra-precise resin 3D printing for detailed prototypes with smooth surfaces and fine features.

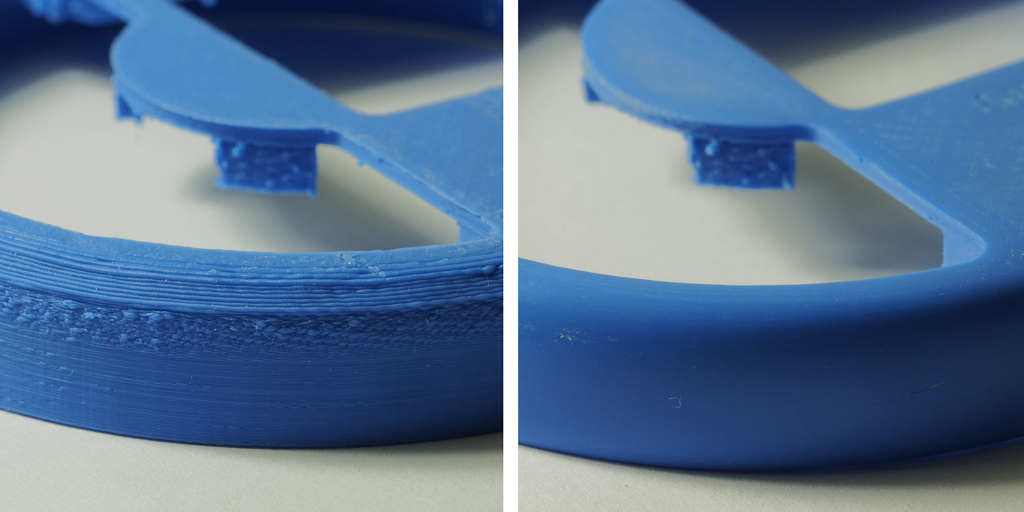
If the top layer of your 3D print is rough, you’re not alone. Uneven lines, visible gaps, and messy textures on the 3D print’s top surface are common issues for hobbyists and professionals alike. These 3D printing top layer problems don’t just affect how your part looks—they can also impact fit, usability, and post-processing.
This guide will show you how to smooth top layer 3D print surfaces with practical steps you can apply immediately. We’ll cover what causes rough finishes, how to fix them before printing, and how to clean them up afterward. Whether you’re working with PLA, ABS, or another filament, you’ll find tips that work with your setup.
Need a better finish without sanding or tweaking settings? Explore our SLA 3D printing services for parts with high-resolution surfaces right off the printer—no finishing required.
Let’s take a closer look at how to smooth 3D prints and solve the most common issues with the top layer.
Need a perfect finish but don’t have time for post-processing? Take a look at our SLA 3D printing services for high-quality surface detail—no sanding required.
Understanding The Causes Of Rough Top Layers
Before jumping into fixes, it’s important to know why the top layer of a 3D print is rough in the first place. The problem usually comes from a few settings or material behaviors that don’t show up until the final layers of the print.
Here are the most common causes of a 3D print’s rough top layer:
- Poor layer adhesion – If the top layers don’t stick well to the infill or each other, you’ll see gaps, loose lines, or a weak finish.
- Wrong slicer settings—Incorrect temperature, extrusion width, or print speed can all lead to surface issues. Too little material or poor retraction settings can leave thin or stringy top surfaces.
- Low infill density – The top layers need a solid base to print cleanly. Infill that’s too sparse can cause the top to sag or look uneven.
- Cooling issues – Without enough fan speed, hot plastic doesn’t solidify fast enough, which can cause warping or inconsistent layering.
- Material-specific behaviors – PLA is more forgiving but can still show minor defects if print speed is too high. ABS needs steady cooling and benefits from enclosure. PETG tends to show stringing if not well-tuned.
Most 3D printing top layer problems come from a combination of these factors. Once you know what to look for, you can start adjusting settings or prep your print for smoothing techniques later.
Also, read:
Pre-Print Adjustments For A Smoother Top Layer
If the top layer of a 3D print is rough, your first solution shouldn’t be sanding—it should be checking your print setup. A few small tweaks in your slicer and hardware settings can dramatically improve the surface quality. This section focuses on what to fix before printing to reduce the need for time-consuming post-processing.
Knowing how to smooth top layer 3D print results starts here—with proper settings, the right materials, and stable printing conditions.
Slicer Settings That Matter
Your slicing software determines how many top layers are printed and how they’re supported. Here are the key things to adjust:
- Top Layer Count (Top Solid Layers)
Use at least 4 to 6 top layers in your slicer settings. This gives the printer enough material to fully cover the infill and create a sealed, smooth surface. Too few layers often result in visible infill lines or even holes on the surface. - Layer Height
Lowering your layer height improves surface finish because each line is thinner and blends more easily. For example, a 0.12 mm layer height often gives a smoother 3D print top than a 0.2 mm setting, though it does increase print time. - Infill Density & Pattern
The top layers print over the infill, so a weak internal structure can lead to sagging. Use 20–30% infill for most models, and choose stable patterns like grid, triangles, or gyroid to provide better top-layer support.
Print Speed and Temperature Adjustments
If you print too quickly or at the wrong temperature, your top layer may not have time to settle and cool properly, causing bulges, strings, or gaps.
- Reduce Print Speed
Slowing your speed (try 40–50 mm/s for top layers) gives the nozzle time to place material accurately, reducing streaks and improving coverage. - Tune Your Nozzle Temperature
Make sure your temperature matches the material. PLA generally runs well at 190–210°C, but too much heat can cause over-extrusion and blobs on the surface. PETG and ABS each have their own ideal range—check your filament specs.
Use Quality Filaments
Low-grade or poorly stored filaments can cause extrusion issues that show up most noticeably on the top layer. If you’re seeing inconsistent flow or small holes, check your filament:
- Look for reputable brands that print consistently.
- Always store spools in a dry box or with desiccant to avoid moisture absorption, which can cause bubbling or poor adhesion between layers.
Printer Maintenance Can Help Too
Even the best slicer settings won’t help if your hardware isn’t performing well. Make sure your:
- Nozzle is clean – residue buildup can lead to inconsistent extrusion.
- Extruder is calibrated to avoid over- or under-extrusion.
- The cooling fan is working properly, which is especially important for materials like PLA that benefit from solid cooling for the top layers.
These adjustments are the first step in fixing a 3D print rough top layer. They don’t require extra tools or chemicals—just smart setup and reliable materials. If you still need a better finish after printing, the next section will walk you through exactly how to smooth 3D prints using hands-on post-processing methods.
Post-Processing Techniques For Smoothing The Top Layer
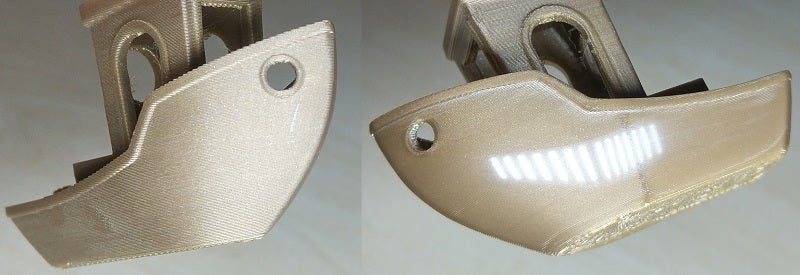
Even with the right slicer settings, sometimes the 3D print top still needs some extra work to look polished. Whether you’re prepping a display model or just want a cleaner finish, post-processing is your next step.
There’s no one-size-fits-all approach. The best method depends on your filament type, part size, and desired finish. Below are the most effective ways to smooth the top layer of 3D prints once they’re off the printer.
Mechanical methods like sanding and polishing are common, especially for PLA and PETG. They’re inexpensive, effective, and safe for most materials.
Sanding
Start with a coarse grit (around 200–300) and work your way up to a fine grit (800–2000). Always sand in small, circular motions and be careful around edges.
- For flat top layers, use a sanding block or foam pad to keep things even.
- For curved surfaces, flexible sandpaper or sponge abrasives help maintain shape.
Make sure the part is fully cooled before sanding. If you notice the top layer peeling or chipping, stop and move to a finer grit.
Polishing
Once sanded, you can use plastic polish or a soft cloth to buff the surface. This step adds a subtle shine and removes fine dust. It works especially well after using a filler primer or spray coating.
Chemical Smoothing
Chemical methods can quickly improve surface quality, but they’re only suitable for specific filaments, and must be used safely.
Acetone Vapor for ABS
Acetone smoothing is common for ABS prints. The part is exposed to acetone vapor in a sealed container (never submerged). This slightly melts the surface, creating a glossy, uniform finish.
- Ideal for fixing small layer lines and top surface inconsistencies.
Not recommended for parts with fine detail or thin walls—overexposure can distort features.
PLA-Compatible Coatings
PLA doesn’t respond to acetone, but there are purpose-made PLA smoothing solutions and brush-on coatings. These act like a resin layer, filling gaps and hardening to a smoother surface.
Some options include:
- Smooth-On XTC-3D
- Polymaker Polysher (used with Polysmooth filament)
Always wear gloves and work in a well-ventilated area when using chemicals.
Heat-Based Smoothing
Heat guns or hot air tools can soften the outer surface of a 3D print top just enough to reduce roughness. But this method requires care.
Heat Gun Method
- Hold the heat gun a few inches from the surface.
- Sweep back and forth quickly—never hold heat in one spot.
- Start with the lowest setting and gradually increase if needed.
Heat can cause warping or color changes, especially with PLA. Use this method only on thicker parts and avoid it entirely for high-detail or heat-sensitive models.
These methods are all helpful if your 3D print rough top layer isn’t something you can fix by changing print settings. For the best results, combine a few: light sanding, followed by polishing or a finishing coat, often gives a clean, professional look.
Advanced Techniques For A Professional Finish
If you’re aiming for a polished, high-end appearance, basic sanding may not be enough. These advanced methods are often used in prototyping, product design, or functional models where appearance matters just as much as performance.
They take a little more time and prep, but they’re worth it when you want to show off your work—or finish a part that’s client-ready.
If you’ve been wondering how to smooth 3D prints beyond just sanding, this is where to look.
Filler Primer and Painting
Filler primer is a spray coating that fills in tiny gaps and print lines. It’s often used as a base before painting.
Steps:
- Sand your part lightly to remove big surface issues.
- Apply 1–2 light coats of filler primer.
- Let it dry, then wet sand with 400–600 grit.
- Repeat if needed, then finish with your desired paint.
Best for: PLA, PETG, and models intended for display or visual prototypes.
Resin Coating
Resin coating creates a smooth, sealed outer shell. It’s applied by brushing or pouring a thin layer of epoxy resin over the part, then allowing it to cure.
Pros:
- Levels out surface imperfections.
- Adds durability and a glossy finish.
- Great for cosplay props, decorative pieces, or parts exposed to handling.
Use it in a dust-free area and wear gloves. For best results, sand and clean the model before applying.

Epoxy or Clear Coatings
Clear coatings like polyurethane or two-part epoxy resins give prints a tough, professional surface. These can be brushed on or sprayed.
Some resins even add UV resistance and make the part water-resistant.
Tips:
- Apply multiple thin layers rather than one heavy coat.
- Allow full curing time between coats.
- Combine with color paints underneath for a layered effect.
These coatings can significantly improve both the look and durability of the top layer of your print.
Using any of these advanced techniques will get you closer to a showroom-quality part. They’re especially useful if the 3D print top will be visible or handled often.
🛑 Common Mistakes In Smoothing 3D Prints
Mistake | What Happens | Why It Happens | How to Avoid It |
Over-Sanding | Loss of detail or uneven surface | Using coarse grit or applying too much pressure | Sand gently with proper grit progression; test on a small area first |
Wrong Method for Material | Warping, no effect, or poor bonding | Using acetone on PLA, or resin on incompatible materials | Match smoothing technique to filament type (e.g., acetone for ABS only) |
Ignoring Print Settings | The top layer prints poorly before smoothing even begins | Low top layer count, poor cooling, or weak infill | Adjust slicer settings for top layers, infill, and fan speed |
Rushing Chemical or Resin Coatings | Sticky surface, bubbles, or uneven layers | Applying too much at once or skipping drying time | Apply thin coats, follow product instructions, and allow full drying/curing |
Skipping Safety Precautions | Health risks from fumes, dust, or burns | Not using protection or working in unventilated areas | Wear gloves, goggles, mask; work with chemicals in well-ventilated spaces |
Final Thoughts: Smoother Prints Made Simple
A smooth top surface is more than just a nice visual—it’s often the final detail that makes your 3D print look polished and ready to use. Whether the 3D print top is part of a prototype, display model, or functional part, getting it right can make a real difference. We’ve covered both pre-print and post-processing methods to help you learn how to smooth top layer 3D print results. From adjusting slicer settings to sanding and resin coating, there’s a solution that fits your setup, budget, and experience level. If you’re short on time or want a factory-level finish without the work, we’re here to help. Additive Plus offers high-resolution SLA printing services and DMLS metal printing—perfect when you want sharp detail and smooth surfaces right off the build plate. And remember, whether you’re sanding, painting, or adjusting print settings, getting better at how to smooth 3D prints takes practice—but it’s worth it.
Explore What’s New in 3D Printing
3D Printing: How to Make Supports Easy to Remove for Flawless Prints
Additive Plus Joins Axtra3D as Official Professional Reseller
316 vs 304 Stainless Steel: Which One Is Best for Your Project?
3D Printing Troubleshooting: Common 3D Printing Issues and How to Fix Them
Related Posts
1. Introduction Additive manufacturing, commonly known as 3D printing, has fundamentally transformed modern product development,…
Metal additive manufacturing has fundamentally transformed the way industries approach design and production, enabling the…
Imagine a manufacturing process capable of producing parts measured in meters, not millimeters—components so vast…
Ashkhen Ovsepyan
Additive manufacturing expert and tech business leader, focused on global strategy, innovation, and advancing women in 3D printing.