What Is a Slicer and Why Is It Essential for Successful 3D Printing?
Every successful 3D print starts long before the printer begins its job. It begins with the slicer—a tool that transforms your 3D design into instructions your printer can follow.
A slicer isn’t just necessary—it’s the key to unlocking your printer’s full potential. The right software and properly tuned slicing parameters can significantly impact print quality, stress resistance, and overall success. It’s what turns a great design into a flawless 3D print.
In this article, we’ll break down:
- What is a slicer in 3D printing and why does it matter?
- Key features to look for in a slicer.
- How to use one effectively to avoid costly mistakes.
Whether you’re new to 3D printing or an industry pro, understanding slicers will elevate your results.
Let’s dive in!
What Is A Slicer In 3D Printing?
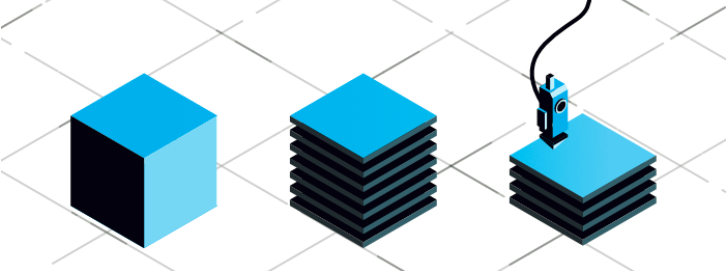
A slicer is software that takes your 3D model and “slices” it into thin layers. Think of it as the translator between your design and the 3D printer. It converts your 3D object into a slicer converts your design into instructions that your 3D printer can interpret—whether it’s G-code for CNC-based printers or another machine-specific format. Every 3D printer requires slicing, either externally on a computer or internally within the printer itself, to build the model layer by layer.
Here’s how it works:
- Imports your 3D file: You start with a digital design, usually in STL or OBJ format.
- Generates layers: The slicer breaks the model into horizontal slices, similar to cutting a loaf of bread.
- Plans the path: It calculates the most efficient way to print each layer, from speed to material usage.
This step is crucial. Without accurate slicing, your print might fail or waste valuable 3d printing materials. The slicer not only prepares the print job but also allows users to fine-tune parameters—depending on the software and printer—to achieve optimal results and ensure the final product meets expectations.
Why A Slicer Is Crucial For 3D Printing Success
- Material Compatibility: Ensure the slicer supports the materials you plan to use. Whether you’re working with SLA resin, polymers, or metals like titanium or stainless steel, the slicer must be able to handle the specific properties of each material for optimal results.
- Ease of Use: A good slicer should be intuitive enough for beginners but also offer advanced options for professionals. It should have a user-friendly interface with clear icons and easy-to-navigate menus. Advanced features like support generation or print speed adjustments should be accessible but not overwhelming.
- Customizable Settings: You need to have control over key aspects of your print, like layer height, infill density, support structures, and speed settings. A slicer should allow for fine adjustments to these parameters, giving you the flexibility to optimize for quality, strength, or speed.
- Support for Advanced Technologies: If your workflow involves advanced 3D printing technologies, like dual extrusion or multi-material printing, ensure the slicer has features to handle these. DMLS (Direct Metal Laser Sintering) systems and SLA printers also require specific slicing functions to handle high-resolution details or metal alloys.
- Integration with Printers: Your slicer must seamlessly integrate with your 3D printer to avoid compatibility issues. Look for slicers that work smoothly with your printer’s specific technology, whether it’s SLA, DMLS, or FFF systems. This ensures optimal results and minimizes the chance of errors during printing.
Still unsure what is a 3D printer slicer and why it’s important? A 3D printer slicer is more than just a converter. It’s a critical part of your print success. A poorly configured slicer can lead to failed prints, material waste, or fragile parts.
Here’s why choosing the right slicer matters:
1. Control Over Print Quality
The slicer gives you full control over settings like layer height, print speed, and infill density. These options allow you to strike the perfect balance between visual detail and printing efficiency. Whether you’re prototyping or producing final-use parts, the slicer ensures your quality standards are met.
2. Material Optimization
Every material—PLA, ABS, PETG, or metal—has unique requirements. A good slicer adjusts temperature, speed, and cooling settings accordingly, minimizing common issues like warping, stringing, or adhesion failure. Efficient slicing helps reduce material waste and saves costs.
3. Support for Complex Geometries
For parts with overhangs, bridges, or intricate cavities, the slicer automatically generates supports, rafts, and brims. This is crucial in preserving your design integrity during printing and post-processing.
4. Customization for Specific Use Cases
Need stronger walls? A different infill pattern? Faster print times? Slicers let you fine-tune almost every print parameter to suit the specific needs of your project. This flexibility is especially important in fields like product development, education, engineering, and healthcare.
Read a related article:
Key Components Of A Slicer That You Need To Know
The slicer’s power lies in the customization it offers through its key components.
Here’s a closer look at the settings you’ll adjust to get the best prints possible:
Component | Description | Effect on Printing |
Layer Height | Thickness of each printed layer. | Smaller height = smoother, finer details in Z (slower print). Larger height = faster print (less detail in Z). |
Print Speed | Controls how fast the printer moves along the X, Y, and Z axes. | Faster speed = quicker prints, but can reduce quality. Balanced speed ensures quality. |
Infill Density & Patterns | Amount of material used inside the print. Slicer allows choosing different infill patterns (e.g., honeycomb, grid). | Higher density = stronger parts but more time and material. Patterns balance strength/material use. |
Supports and Rafts | Supports for overhangs and rafts under prints to help adhesion. | Supports prevent collapse of complex shapes, rafts help adhesion to the build platform. |
Mastering these components helps you control every detail of your print, ensuring that you achieve your desired results efficiently and accurately. With the right settings, you can print just about anything—from functional parts to highly detailed prototypes.


Different densities of infill (in yellow), from solid to hollow.
Features To Look For In A Good Slicer
- Material Compatibility: Ensure the slicer supports the materials you plan to use. Whether you’re working with SLA resin, polymers, or metals like titanium or stainless steel, the slicer must be able to handle the specific properties of each material for optimal results.
- Ease of Use: A good slicer should be intuitive enough for beginners but also offer advanced options for professionals. It should have a user-friendly interface with clear icons and easy-to-navigate menus. Advanced features like support generation or print speed adjustments should be accessible but not overwhelming.
- Customizable Settings: You need to have control over key aspects of your print, like layer height, infill density, support structures, and speed settings. A slicer should allow for fine adjustments to these parameters, giving you the flexibility to optimize for quality, strength, or speed.
- Support for Advanced Technologies: If your workflow involves advanced 3D printing technologies, like dual extrusion or multi-material printing, ensure the slicer has features to handle these. DMLS (Direct Metal Laser Sintering) systems and SLA printers also require specific slicing functions to handle high-resolution details or metal alloys.
- Integration with Printers: Your slicer must seamlessly integrate with your 3D printer to avoid compatibility issues. Look for slicers that work smoothly with your printer’s specific technology, whether it’s SLA, DMLS, or FFF systems. This ensures optimal results and minimizes the chance of errors during printing.
Step-by-Step Guide To Using A Slicer
Whether you’re a hobbyist, an engineer, or part of a company adopting additive manufacturing, understanding the slicing process is key to producing reliable, high-quality prints.
Slicing isn’t just a technical step—it’s the foundation of your 3D print. A slicer in 3D printing transforms your 3D model into printable instructions. This software allows you to control how each layer is printed, optimize material usage, and ensure your part is successfully manufactured.
Let’s walk through the process, step by step.
Step 1: Importing Your 3D Model
Before you can slice anything, you need a 3D model. Slicers accept standard design files such as STL, OBJ, or 3MF. These files contain the geometry of your model but not instructions for printing.
- Simply drag and drop or use the import function in your slicer.
- Check your model for errors—some slicers include automatic repair tools to fix non-manifold edges or holes.
Step 2: Selecting the Printer and Material Profile
Every printer has different capabilities, and so does every material. That’s why slicers let you select both the printer model and the material profile.
- Printer selection ensures the G-code matches the printer’s hardware (e.g., bed size, nozzle diameter).
- Material profile adapts for temperature, cooling, and extrusion settings based on whether you’re using PLA, ABS, PETG, resin, or even metal filaments.
This is an essential part of what slicing means in 3D printing—the software customizes output based on hardware and material compatibility.
Step 3: Adjusting Layer Height, Infill, and Speed Settings
This is where slicing gets powerful—and personal. Here’s how you fine-tune your print:
- Layer Height
A thinner layer height (e.g., 0.1mm) yields better surface quality, ideal for prototypes and cosmetic parts. A thicker layer (0.2–0.3mm) prints faster and is better for utility parts. - Infill
The internal structure of your print affects strength and material usage. Use:- 20% infill for lightweight prototypes
- 50–100% for functional, load-bearing parts
- 20% infill for lightweight prototypes
- Print Speed
Higher speeds reduce print time but may lower detail. Slicing software helps you test and balance these settings.
All of this illustrates what a slicer in 3D printing really does: it gives you full control over how the part is constructed.
Step 4: Adding Supports, Rafts, or Brims for Stability
Some prints just won’t stand on their own—literally. If your model has steep overhangs, bridges, or fine structures, support structures are crucial.
- Supports act like scaffolding for overhangs and are removed after printing.
- Rafts create a flat base to improve bed adhesion.
- Brims increase surface contact to prevent curling or detachment.
These features are why slicing in 3D printing is more than just dividing layers—it’s also about preparing the model for real-world physics and gravity.
Step 5: Previewing the Sliced Model
Before committing to the print, most slicers provide a preview mode. This lets you visually inspect how each layer will be printed. Look for:
- Gaps in support
- Thin layers that may not adhere
- Long travel moves that could lead to stringing or shifting
This is your final chance to catch mistakes before you waste filament or time.
Step 6: Exporting the G-code for Printing
Once satisfied, hit “Export” or “Save to SD Card”. This G-code file contains all the commands the printer needs to reproduce your model—line by line, layer by layer.
G-code tells the printer:
- Where to move the print head
- How fast to extrude material
- When to heat or cool
- How to build your part exactly as designed
Many users iterate on this process to improve results over time, experimenting with different slicers or settings.
Why the Right Slicer Matters
What is a slice in 3D printing? It’s the basis of everything your printer does. A single change in your slicer—like support angle or infill density—can drastically improve or ruin your outcome.
A good slicer:
- Boosts print success rates
- Reduces material waste
- Enhances surface finish
- Improves strength and functionality
Businesses adopting 3D printing should take slicing seriously. The right software ensures better output, lower failure rates, and smoother scaling.
Common Challenges When Using A Slicer (and How to Overcome Them)
While slicers are powerful tools, they can present some challenges, especially when you’re fine-tuning prints for optimal results. Here’s a breakdown of common issues and tips on how to tackle them:
Over-Supporting or Under-Supporting
Getting the support structures right is crucial for complex models. Too many supports can waste material and increase post-processing work, while too few can result in failed prints. The key is calibration:
- Adjust support density to balance strength and material use.
- Use support patterns like tree supports or grid patterns for better efficiency.
- Experiment with support placement to ensure overhangs stay secure without unnecessary bulk.
Incorrect Layer Height Settings
Finding the right layer height is a balancing act between quality and speed. A lower layer height gives you finer detail but takes longer to print. If you’re aiming for faster production, consider using a slightly higher layer height, but be cautious:
- For detail-heavy models, stick with a finer layer height.
- For functional parts, a larger height can speed up the print without significantly affecting strength.
Material Profiles
Different materials behave differently during printing, and fine-tuning material profiles is essential. Non-standard materials like metals or composites require specific settings that may not be available by default in your slicer:
- Adjust temperature settings for both the print bed and extruder.
- Fine-tune cooling rates to prevent warping or cracking.
- Test prints are essential when experimenting with new or non-standard materials to avoid costly mistakes.
Misalignment of Settings with Printer Capabilities
Understanding your printer’s hardware limitations is crucial to avoiding wasted time and material. If your slicer settings don’t match your printer’s capabilities (e.g., speed settings that exceed the printer’s performance), you may experience failed prints or poor quality:
- Match speed settings to your printer’s specifications to ensure optimal performance.
- Check your printer’s resolution and adjust the layer height accordingly to avoid excessive strain on the hardware.
By addressing these challenges with careful adjustments and understanding your equipment, you’ll achieve more successful and efficient prints, saving time and material in the process.
Popular Slicers on the Market: Pros and Cons
There are numerous slicers available, each designed for different levels of expertise and applications. Here’s a quick overview of popular options and their pros and cons to help you make an informed decision:
Slicer Type | Slicer | Pros | Cons |
Entry-Level Options | Free, intuitive interface, supports a wide range of printers, regular updates. | Limited advanced features, may require plugins for customization. | |
Easy to use, ideal for both beginners and advanced users, extensive library of presets for different printers. | Slightly limited material profiles compared to higher-end options. | ||
Advanced Software | Comprehensive control over all aspects of the print, advanced preview features, great for multi-material and dual extrusion setups. | Expensive, not beginner-friendly. | |
Optimized for SLA, straightforward, ideal for high-detail prints. | Limited to Formlabs printers, not as customizable as others. | ||
Excellent for large-scale, high-precision, and complex models, integrates well with industrial-grade machines. | Expensive, steeper learning curve. | ||
Specialized Slicers | Optimized for SLA models, easy to use, highly compatible with Formlabs printers. | Only works with Formlabs printers, limited flexibility for other applications. | |
Offers extensive control over metal printing parameters, highly customizable for metal applications. | Complex for beginners, requires significant knowledge of materials and machine settings. |
Understanding your specific 3D printing needs will help you choose the right slicer to optimize your workflow and achieve the best results.
Optimize Your Slicing Process With Additive Plus
At Additive Plus, we combine innovation and expertise to ensure your slicing process is optimized for success. As an industrial integrator with over a decade of experience, we specialize in advancing the adoption of 3D technologies, helping clients seamlessly transition their products and production processes to additive manufacturing. Our curated portfolio includes industry-leading brands like Farsoon Technologies (DMLS, SLS), Kings3D (SLA, FGF, SLS), and 3DCeram (ceramics, SLA), ensuring compatibility with a wide range of slicers and advanced printers.
With a deep understanding of materials—from ceramics and metals to polymers and carbon fiber—we tailor solutions to meet your specific needs. Whether you require:
- Guidance on selecting the right slicer
- Seamless integration with high-performing equipment
- Expert training and troubleshooting
Additive Plus provides end-to-end support. From our 3D Printing Laboratory in Los Angeles to our consulting services, we empower you to unlock the full potential of your 3D printing projects. With our commitment to innovation, diversity, and accessibility, we ensure that your slicing process is not just a step, but a leap toward achieving excellence.
Ready to optimize your 3D printing workflow?
Get a Quote Today!
Frequently Asked Questions About Slicing in 3D Printing
What is slicing in 3D printing, and why is it important?
Slicing is the process of turning a 3D model into thin, horizontal layers and generating a G-code file that instructs the printer how to build the object layer by layer. This step is essential because it determines the accuracy, material efficiency, strength, and overall success of the final print.
What is a slicer in 3D printing?
A slicer is a software tool that processes your 3D model and prepares it for printing by dividing it into layers and creating a detailed set of instructions for the printer to follow. Without a slicer, a 3D printer cannot understand how to turn your digital design into a physical object.
What does slicing mean in 3D printing?
Slicing refers to the act of digitally cutting a 3D model into thousands of horizontal layers that the printer can build one at a time. This process enables the printer to understand how to move, extrude material, and create the object accurately.
Can I 3D print without using a slicer?
In most cases, no. Slicing is an essential step in the 3D printing workflow. Without it, the printer would have no instructions to follow. While a few printers have built-in slicers, nearly all require external slicing software to function properly.
What is slice in 3D printing?
A slice is a single, horizontal layer of a 3D model that will be printed during the additive process. Each slice is printed sequentially, and together they form the final 3D object.
What slicer should I use?
The best slicer for you depends on your printer type, printing technology, experience level, and desired control over print settings. It’s important to choose a slicer that is compatible with your hardware and that gives you access to the features you need.
Do all slicers work with every 3D printer?
No, not every slicer works with all printers. Some slicers are designed for specific machines or technologies, while others support a broad range of models. Always verify compatibility or check if you can create a custom profile for your printer.
Are slicers different for each 3D printing technology?
Yes, different printing technologies require different types of slicers. For example, filament-based printers, resin-based printers, and metal-based printers each have unique requirements, and their slicers are specifically designed to handle those needs.
How do I know if my slicing settings are correct?
You can check the accuracy of your slicing settings by using the preview mode in the slicer, which allows you to examine the path and behavior of the printer before starting the job. Running small test prints and adjusting based on results is a helpful way to fine-tune your setup.
What happens if slicing is done incorrectly?
Incorrect slicing can lead to failed prints, weak parts, poor surface quality, wasted material, or even printer malfunctions. Issues like incorrect support placement, improper infill, or inaccurate speed settings can all result from poor slicing.
Are there free slicers for beginners?
Yes, many slicers are designed to be user-friendly with pre-configured settings for common use cases. These slicers often provide basic modes for beginners and advanced options for more experienced users.
Can I change slicers after starting a project?
Switching slicers in the middle of a project is possible but not ideal. Slicers use different calculation methods and settings, so changing tools may require you to manually re-enter all the parameters to ensure consistency.
Is slicing automatic or do I have to do it manually?
Most modern slicers automate the slicing process once you import the model and choose basic settings. However, you can manually adjust parameters such as layer height, infill, supports, and print speed to better suit your project goals.
What settings in the slicer affect print quality the most?
Key slicer settings that affect print quality include layer height, print speed, nozzle temperature, bed temperature, infill density, and support structure configuration. Proper tuning of these settings can greatly improve the appearance and strength of your prints.
How long does the slicing process take?
Slicing usually takes only a few seconds to a few minutes, depending on the complexity of the model and the performance of your computer. Larger, more detailed models may require additional time to slice properly.
Can slicing software help reduce material waste?
Yes, efficient slicing can minimize material waste by optimizing infill density, support usage, and wall thickness. Smart use of these settings can save time, material, and money without compromising quality.
Is there a difference between slicing for prototypes and final-use parts?
Yes, slicing for prototypes often prioritizes speed and material conservation, while slicing for final-use parts emphasizes strength, dimensional accuracy, and surface finish. The settings you choose should reflect the function of the part being printed.
Can a slicer fix problems in the 3D model?
Some slicers include basic repair functions that can fix common geometry issues, such as holes or non-manifold edges. However, serious design errors should be corrected in CAD software before slicing.
Explore What’s New in 3D Printing
Related Posts
1. Introduction Additive manufacturing, commonly known as 3D printing, has fundamentally transformed modern product development,…
Metal additive manufacturing has fundamentally transformed the way industries approach design and production, enabling the…
Imagine a manufacturing process capable of producing parts measured in meters, not millimeters—components so vast…
Ashkhen Ovsepyan
Additive manufacturing expert and tech business leader, focused on global strategy, innovation, and advancing women in 3D printing.